When the board becomes “bricked” (unresponsive to GUI), it may be necessary to manually flash the board and load a recovery version of the firmware onto the board.
The process for doing this is listed below. If successful, this will enable the user to upgrade the firmware through the normal automatic process (i.e. this process is NOT sufficient by itself to restore normal operation to the Helix). It is very important to follow the steps given carefully and in order. Use this procedure ONLY if you are unable to establish any communication with the board, despite having establishing successful communication with it previously.
- Disconnect any power source (i.e. battery and USB cable).
- Find the location for connecting the binding plug. This may be:
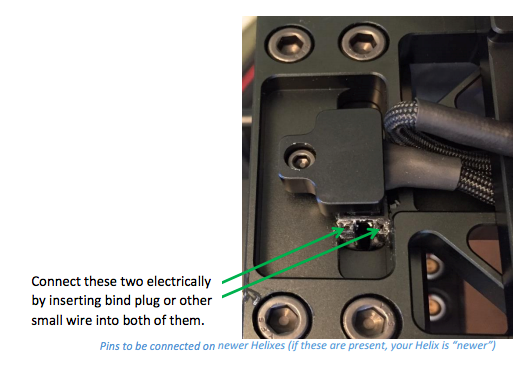
- On the bottom (see image below). Note: if there is one connector with three holes in this location, then you should use the outside two holes and skip the middle one.
- If you have a two-pin LEMO labeled expansion on the back of your Helix, use these two holes.
- If you have a three-pin LEMO labeled expansion on the back of your Helix, use the hole aligned with the red dot and either one of the other two holes
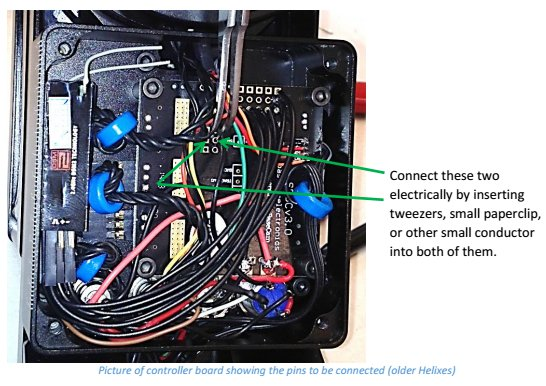
- If none of these exist on your Helix, you have one of the original Helix models. Remove the cover from the controller board box and use the holes shown by the two green arrows in the picture below.
- Connect the two FLASH pins using something conductive (e.g. Bind plug provided with Helix, tweezers, paper clip, wire) as shown in one of the pictures below, depending on whether you have the newer or older style flash mechanism.
- Connect the Helix to your computer via USB cable
- Run GUI and go to the connection section of the Basic tab. Select the COM port that is associated with the USB cable (listed with “SLAB” in the name on Macs), but don’t connect.
- Go to “Upgrade firmware” – “Manual” tab. DO NOT PRESS “CONNECT” IN THE GUI, IF JUMPER IS CLOSED (connected with conductive object)! If pressed, you need to repeat all steps from the beginning.
- Choose firmware file Simplebgc_32bit_recovery (*.hex for Windows, *.bin for all other). This file is located in the “firmware” folder in the GUI file structure. If multiple .bin files exist, use the one with the shortest name.
- For “Board Version” select v.3.x (32bit) through Virtual COM Port
- Press “FLASH” button and wait for the process to finish.
- Disconnect the USB cable.
- Open (remove) FLASH jumper (tweezers/paper clip).
- Continue with the standard firmware upgrade procedure
Note: After flashing a recovery firmware, your board may beep like crazy when you reconnect to the GUI. Not to worry. Simply install the proper firmware using the standard firmware upgrade procedure and it will stop beeping.